Showing posts with label #embossing. Show all posts

Monday, November 15, 2021

"Silver and Gold" Technique Blog Hop


Welcome to this Technique Blog Hop where we are creating artwork with Silver and/or Gold. Participants can choose to incorporate either, or both, into their designs and I can't wait to see what everyone has to share today. 

If you are coming from Katy's Blog, you are on the right track. You can find a complete list of participants provided at the bottom of this post.


I experimented with a few Silver and Gold ideas and finally settled on these simple, but striking, ornaments by way of "shakers". These Star Shaker Window Thin Cuts were great for making these elements that could be hung on a tree or used as gift tags. They could also serve two-fold as an element on a Christmas card that could then be used as an ornament. 

They were super simple to put together. I used the respective Silver and Gold Embossing Powders, as well as Glitter Paper. The cardstock colors used are Sapphire and Scarlet. The Star Confetti, in both shades, were obviously perfect. I did use Thread in order to create the hanging ribbon. 

I know you'll be inspired with the artwork that lies ahead. Now, head on over to Haley's Blog to see what she has created to share with us today. Thank you for stopping by!


List of Participants:

1. Melissa Robinson *YOU ARE HERE*
2. Haley Dyer
3. Cat Nowak
4. Michelle Loncar
5. Wendy Kessler
6. Darlys Recker
7. Brandi Robinson
8. Michelle Johns
9. Judy Dahlgren
10. Tamara Sandwisch
11. Katy Taylor

Thursday, January 24, 2019

In Any CASE...with Melinda & Melissa

I

Join us twice a month as we CASE, “Copy And Selectively Edit”, artwork created by the Art Department of Close To My Heart as showcased in the current Idea Books and our Make It From Your Heart How-To Books.

On the 2nd and 4th Thursday of each month, at 7 pm CST, we will direct you towards a piece of art and recreate it using the exact products or others that compliment its initial design. Tips, techniques and assembly directions will be shared in detail to help you recreate them on your own.

As you reproduce the items we have shared, post them on social media using the hashtag #ctmhinanycase. We will randomly search that hashtag and reward those who CASE our items. Winners will be announced on our blogs so be sure to follow us!

*************************************************


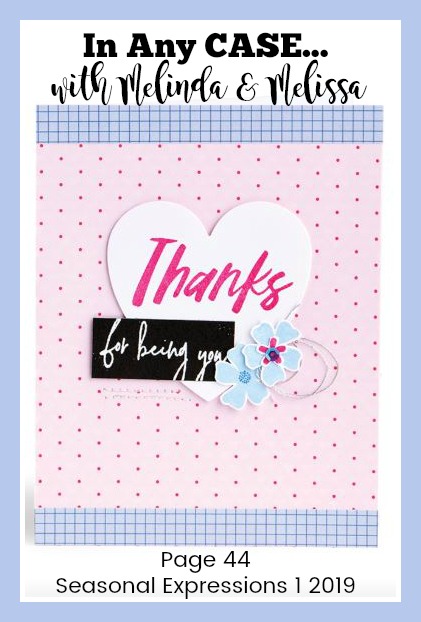
This is the card I am CASEing today. I love the colors and the sentiments, both which drew my attention. 


Other than using a few tools, this card was pretty quick to put together. You will notice that I switched out the paper on the top edges of the card front. I used the "graph paper" pattern, from "I Heart Us", on some layouts and didn't have enough to use it on the card so I switched those pieces out with Carolina cardstock. I think it looks fine! 


The heart was cut from Thin Cuts, with "thanks" stamped in Raspberry Ink. The flowers were stamped in Carolina and Raspberry inks and were fussy-cut. 

To get the Embellishing Thread in place on the backside of the heart, I put adhesive and then formed it as desired. It wasn't a difficult process, thank goodness. I love all of the elements on this card front that go together nicely. 


This is the beautiful stamp set I used, "I Heart Us - Cardmaking". 

Supplies used:

  • C1760 I Heart Us - Cardmaking Stamp Set
  • X7242B I Heart Us Paper Packet
  • X6027 White Daisy Cardstock
  • X5990 Carolina Cardstock
  • Z6028 Black Cardstock
  • Z6508 Bluebird Stamp Pad
  • Z6505 Carolina Stamp Pad
  • Z2812 Raspberry Stamp Pad
  • Z2863 White Daisy Pigment Pad
  • Z4270 I Heart Us Sequins
  • Z4213 Silver Embellishing Thread
  • Z3317 Thin Cuts - Basic Hearts
  • Z2068 Ranger White Super Fine Embossing Powder
  • Z4220 Anti-static Pouch
  • Z4252 Heat Tool


THIS is the awesome card that Melinda is creating for you, with a few twists! You'll want to head over to "If You Bling It" to see all the fun details. 

Be sure to CASE CTMH artwork with us to join the FUN and to be eligible for prizes! That's right, we search social media for the hashtag #ctmhinanycase to see what you are creating and sharing. Contact either of us with your questions.

We look forward to seeing you again, in two weeks, for the next episode of "In Any CASE..." Make it a great weekend! 


Thursday, October 11, 2018

In Any CASE...with Melinda & Melissa

Welcome to this episode of...


Join us twice a month as we CASE, “Copy And Selectively Edit”, artwork created by the Art Department of Close To My Heart as showcased in the current Idea Books and our Make It From Your Heart How-To Books.

On the 2nd and 4th Thursday of each month, at 7 pm CST, we will direct you towards a piece of art and recreate it using the exact products or others that compliment its initial design. Tips, techniques and assembly directions will be shared in detail to help you recreate them on your own.

As you reproduce the items we have shared, post them on social media using the hashtag #ctmhinanycase. We will randomly search that hashtag and reward those who CASE our items. Winners will be announced on our blogs so be sure to follow us!

*************************************************

Today I am showcasing beautiful Christmas cards made with the  Workshop Your Way Mistletoe Wishes Cardmaking KitThis is how they are showcased in the Idea Book on page 52. Don't they look festive and beautiful?


Did you know you get an exclusive stamp set in the kit, as well as full-color directions for assembling 12 cards, 6 each of 2 designs? You do!

The Gold Tinsel Embossing Powder makes all the difference on these greeting cards. It adds the perfect touch to these Christmas cards that are guaranteed to bring some sparkle to the holidays. 

It is not included in the main kit, so be sure to review the Additional Supplies Needed list provided through the link. 


This card was simple to create, yet draws great attention. The holly was embossed and some simple stamped images, plus Gold Glitter Gems, provided a finishing touch. 


I love the ornament on this card, stamped in Candy Apple Ink. Both the "Merry Moments" and upper portion of the ornament were embossed.

TIP: To determine where the string and bow were to be stamped, so it connected perfectly with the ornament, I used the ornament image to see how far I was going to place it from the left edge of the banner. Then, I stamped it accordingly and the rest followed.

I love the design of this card, with the "wishing you" banner going through the ornament.


Here is a close-up of the embossed image. The "tinsel" provides that glittery effect that is perfect. 


You can see the contents of this kit, including the images contained in the exclusive stamp set


Do you have anyone on your Christmas card list who would enjoy receiving one in their mailbox? I would!


Melinda is teaching you how to make this beautiful card using a wonderful and popular new product. You'll want to head over to Melinda's Blog to see her awesome creation!

Wishing you a great end to your week!


Thursday, April 26, 2018

In any CASE...with Melinda & Melissa

Thank you for joining us again for...
Join us twice a month as we CASE, “Copy And Selectively Edit”, artwork created by the Art Department of Close To My Heart as showcased in the current Idea Books and our Make It From Your Heart How-To Books.

On the 2nd and 4th Thursday of each month, at 7 pm CST, we will direct you towards a piece of art and recreate it using the exact products or others that compliment its initial design. Tips, techniques and assembly directions will be shared in detail to help you recreate them on your own.

As you reproduce the items we have shared, post them on social media using the hashtag #ctmhinanycase. We will randomly search that hashtag and reward those who CASE our items. Winners will be announced on our blogs so be sure to follow us!

********************************************************
Melinda and I have some fun artwork to share with you today, a spin off of creations generated from the Close To My Heart Art Department.
I am highlighting the "so happy for you" card shown on the left. Because I don't have a sewing machine, I had to make some adjustments to accommodate the elements of the card.

Be sure to read to the end of this post so you can view what Melinda is sharing with you, with a link provided to take you to her blog.
I enjoy working with vellum and don't do so often enough. I love the softness it provides for artwork,  generating an elegant look. There are some things that need to be considered when using vellum, including a way to attach it so that the adhesive doesn't show and disrupt the desired results. For that reason, I decided to create a black border (as opposed to sewing as done on the original card) that would secure the vellum. 

The Black cardstock was cut at 5 1/2" x 4 1/4" with a 1/4" border allowed on all sides, creating a frame. I then stapled two pieces of White Twine to the black frame, before proceeding, so the back of the staples do not show. 

I glued the piece of patterned paper to the card base. After embossing the floral images, with White Embossing Powder, on the Vellum Paper, I placed a thin line of adhesive around the edges of the vellum piece (where the black would cover it) to secure it to the patterned paper. Then, I adhered the black frame on top of it. 
The sentiment was stamped, in Black ink, on a piece of Bashful cardstock measuring 3/4" x 2 3/4". A dovetail was cut for visual appeal. Add three White Gems and you have a beautiful creation to gift to someone. 

I love the resulting card and hope you do too. It's simple and elegant - a perfect combination, in my opinion. 

Supplies used:

Now, be sure to head over to Melinda's Blog where she is showing you how to make this gorgeous sympathy card using our awesome clear, acrylic stamps.

We always appreciate you stopping by our blogs and encourage you to do your own version of CASEing. Be sure to tag us when you do - #ctmhinanycase - as we search social media ready to reward participants with a prize.

Enjoy the rest of your week and see you next time, on May 10th, for our next episode of "In Any CASE..."!