Sunday, October 31, 2010

It's the November Stamp of the Month Blog Hop!

If you have come here from Adeline's Blog you are on the right path! The blog hop is a great big circle, so you can start here and work your way aaround. If you get lost along the way, you’ll find the complete list of participating consultants here.  This month we have 63 Close To My Heart Consultants sharing their creations using this month's SOTM and other great CTMH products on their blogs. This is simple to do - just click on the link at the end of the post on each blog to move to the next one! Here we go!

This month we are featuring "A Little Thanks", a set of 16 stamps.


I absolutely love the sentiments in this month's stamp set and who can't use a thank you card for someone's kind gesture?

I kept this card somewhat simple wanting to focus on the sentiment.  I used the Olivia paper packet, pewter brads and the GORGEOUS Flourishes Foundry Metal Accessories.  These accessories have been loved by all who have seen them in person so I suggest you include them on your next order! (Z1331 $4.95)  They are self-adhesive!


This card measures 4" x 4".  I took a standard-size envelope, sealed it and cut it into a square (4 1/4" x 4 1/4") so the card would fit inside.  Then I took a sheet of B&T paper, cut it to 4 1/4" x 1" and scored it at 1/4".  Then I folded it and corner-rounded the edges to finish off the envelope.  Of course, stamping another sentiment on the envelope makes for some beautiful and matching stationery.

Another item I made with this stamp set and paper packet was this cute "treat", perfect for place cards around the Thankgiving table.  To create this I used a resource CTMH Consultants have access to.  I took a sheet of cardstock to measure 3 1/4" x 8" and scored at 3 1/2" x 4 1/2".  I folded it and decorated it as desired inserting a lollipop bag filled with candy corn on the inside.  A piece of Cocoa ribbon covered the staple and finished it off nicely.

Now "Hop" on over to Cindy's Blog to see her work! Be sure to visit all the Consultants at their Blogs to get some great crafting ideas and other fun ideas! Remember, the November SOTM is only available until November 30, 2010!  Contact me or click here to see how you can get this stamp set at a discount or even free!  You can see some additional artwork using this stamp set by visiting my website.

Happy Hopping!

Trick-or-Treat!

One of my favorite holidays is Halloween because of the colors...Black, Gypsy (purple), Sunset (orange) and Pear (green).  (These are the names of our CTMH colors.) I love how these colors fit so nicely together and enjoy creating with them!  I have fallen in love with these little Hooligan monsters and will have to see how I can tie them into other occasions throughout the year.  But for the meantime, I'm going to give these little guys a rest.

Pamela O'Connor shared the pattern for this cute treat holder with me.  I made them as "goodies" for an event held here this week and enjoyed making them.  They can hold different variations of candy but I chose to fill them with Kit Kats.

I did adhere a velcro closure but forgot to take a picture of a finished one before I gave them away!

Here's wishing you and yours a safe and Happy Halloween!


Saturday, October 30, 2010

Monday Night Football

I'm a big fan of football (college and pro), despite being married to a football coach.  This past Monday we attended the Monday Night Football game - Cowboys vs. Giants.  Unfortunately, the result was not what we had hoped for but we had a great time in any case!  Here are some pictures of the night's scenes!

Thursday, October 21, 2010

I guess I'll keep him...

...for a little while longer at least.  :0)

Today I was surprised, at work, with this GORGEOUS bouquet of roses!  I don't think I've ever received roses this beautiful before!
My husband sent them to me, one for each year of my 12 years with CTMH!  It was a complete surprise when an office aide walked in with them.  Of course my students got a kick out of it, asking who they were from, and a few started singing, "Secret lover..."  What the heck?!  And they thought they were soooo funny!

He's a sweetie and always knows the perfect thing to do - most of the time!  LOL  He's a keeper!

Love Studio J

I am LOVIN' all the upgrades and additions to Studio J - some which are exclusive to members!  (I'll share more about the memberships after I show you my creations!)  I have debated about the photos I want to physically scrapbook and which I am willing to do through Studio J.  I have realized that no matter how much I enjoy creating layouts, time is always a factor, so I decided to start scrapbooking some memories that have taken place some time ago.  At least I'm getting them scrapbooked, right? 

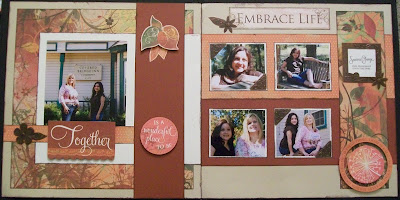
These layouts are from last year's team retreat (March 2009) at the Lone Oak Ranch and Retreat in Gainesville, TX (just north of Denton).  We are having our second retreat there this coming February and I am already looking forward to it!

Both layouts highlight some of the wonderful friends who joined me there and there are more to come! 

Studio J Memberships were newly released and are a great investment for yourself or as a gift.  Studio J Members receive a 50% discount off purchases, free shipping one time each month, exclusive access to patterns and so much more!  A year-long Membership is just $99 and is well worth the benefits!  There is also a 3-month Membership option or a 5-pack - great to give as a gift.  If you would like to read additional information about Studio J click here or feel free to email me with questions.  Studio J is FREE to use so take a moment and check it out!  You just might like it!!!!

Wednesday, October 20, 2010

You Melt My Heart

Ahhhh... lol  I spent this weekend (or part of it) organizing some pre-made layouts with a mission to get some photos on them, if possible, and I was pretty successful.  I will be sharing several of my completions over the next few days so I hope you will check back often!

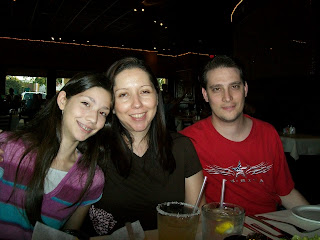
I made these Splendor layouts several months ago and hadn't had any photos I felt would fit on them...until now.  These photos were taken on my birthday weekend in mid-August.  My husband filled the weekend with lots of fun activities but I used these layouts to showcase some of the fun we had in one day - going to Dave & Buster's and the House of Blues.  I did not journal about all the details on these layouts because there are more to come!

Tuesday, October 19, 2010

Olivia Fall Cards

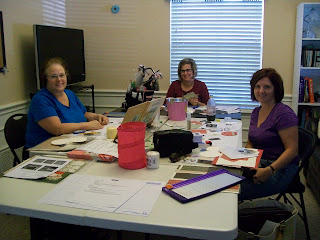
I meet with four wonderful women once a month where we create several cards and an extra goodie.  Yesterday, we met for October and created these cards using the Olivia paper packet.

Made with our Clear Cards as a base.

This is on a standard Colonial White card base.  I LOVE this saying! 
It's contained in "The Present" stamp set.

This card is created on one of our Circle Card bases. 
The "Gratitude" saying is from the November Stamp of the Month. 
Wait until you see all the fabulous sayings in that stamp set!

This is also on a standard-size Colonial White card base. 
I love this patterned paper on the right side of this card!  It's sooo pretty!

Monday, October 18, 2010

Happy 12th CTMH Anniversary tooo meeee!

It's hard to believe that 12 years ago today I become a Close To My Heart Consultant!  I could not have made a better decision and have enjoyed all the fun and benefits that come with being part of a fabulous company!  To commemorate some of what I have experienced with CTMH, I am sharing a layout made of our Director's Dinner held at Convention this past summer.  CTMH Directors always receive some fun perks throughout the year and at corporate events and this year was no different!

During our Convention in D.C. this summer we were taken (by cab - lol) to a boat dock off the Potomac River where our dinner boat was to depart.  Okay...so I have to fill you in on the taxi transportation.  We all met in the lobby of the hotel at the indicated time that evening but no buses arrived.  When they called to find out what was going on, it was determined that the charter bus company had not followed through with their commitment.  In an effort for us not to miss the boat's departure, the hotel staff solicited every taxicab nearby to transport us.  We jumped in a cab when it arrived and away we went!

The boat was called The Odyssey and we had a three-course dinner, with options, and enjoyed a fabulous atmosphere and heartfelt discussions.  I would not have not chosen to be anywhere else than there that evening.  We had a great time and it ended all too soon!

Here's to many more years with Close To My Heart!

Sunday, October 17, 2010

Retreatin' Fun

Last weekend I enjoyed scrapbooking with my Mom and friend, Cindy Denning, at a local scrapbook retreat called the Covered Bridge Inn.  We had a very relaxing weekend which was full of laughter, productivity, and delicious food!

My Mom and her friend, Billie, made the long drive from Silver City, NM to share in the good times.  My Mom rolled through layouts and was pretty darn proud of her creations - and for good reason!  Cindy and I worked on upcoming workshops and they are C-U-T-E if I do so say so myself.  One of them was layouts made with the Olivia paper packet which screamed for some fall pictures!  So...Cindy and I set out on Sunday afternoon to take some photos - taken by a fellow retreater - and they commemorate the good times we had!

Here are some photos and layouts of our enjoyable weekend:

My Mom and I on the doorsteps of the retreat home.


Ahhhh...good times!

Thursday, October 14, 2010

Hooligans Stickease Workshop - $15

On Thursday, October 28th (6:30 p.m. in Arlington, TX), and just in time for your Halloween photos, join me for some fun as we create 2 layouts using the Hooligans Level 2 Paper Packet.  The fee is just $15 (plus shipping and tax)!

Here is one of the layouts we will make.  In order to receive the supplies in time, I need an RSVP and the fee paid by October 20th.  Long distance persons are able to participate in this workshop as I will provide detailed directions to complete the projects in your home.  Contact me for complete details or to register!

Wednesday, October 13, 2010

More Halloween Goodies

I attended another fabulous retreat this past weekend hosted by my friend Cindy.  My Mom was in attendance with her friend, Billie and I enjoyed spending time with her  (will post photos in the next few days).  I made these treats for the retreat attendees and they were well-loved. 

Yeah...yeah...I know you know I love the Hooligans paper packet and coordinating images!  Do you think I can use them all year?!  :0) Okay...so maybe not!


Tuesday, October 5, 2010

I love my friend Cindy!

I met my dear friend Cindy Denning nine years ago at a Close To My Heart event when I first moved to the Dallas area.  Since then, and despite my many moves, we have remained great friends and have shared in some very memorable moments over the years.

She recently came to visit me and we had a wonderful time!  We enjoyed a yummy dinner at Hacienda Ranch and then headed out to hear a country western band (which was great as well)! 

Then, Corey treated us to breakfast the next morning at Cracker Barrel.  (It was yummy too!)

I had such a great time and am looking forward to sharing many more fun memories with her!  Who would have known how blessed I would become, in many ways, through Close To My Heart?  (Love ya, Cindy!)

Monday, October 4, 2010

Saturday Team Training

On Saturday, I had several team members and some Consultant friends join me for an all-day training.  My dear friend and downline, Xellina, hosted the event at her house and things couldn't have been better.  We worked on several workshops that I will host this month and next so watch my blog for more information on those details.  
Windy Leal, Xellina Wieland, Kristi Strickland and Lupita Garza take a break for a photo.

Xellina concentrates as she completes her Misteltoe layout.

Consultant friends Karen Grafford, Kimberly Simmons and Cherri Hardcastle post for a photo.

Then we enjoyed a delicious dinner at Rio Mambo in Grapevine - all in good company.

Windy Leal and I enjoying dinner.

Victoria, Xellina and Dan Wieland waiting for the good food!

I know I have said it before but I will say it again, "I love my team and all the fun I have through Close To My Heart!"  I can't wait until the next meeting!

Sunday, October 3, 2010

Stamping on Candles!

Ok...so you really don't stamp ON the candles but it looks like you do! 

I was able to spend yesterday with several team members in the area.  We worked on two Christmas workshops and decorated candles! It was a FABULOUS day!  As promised, I am going to share how to do this fun technique that is super easy, takes little time but is a big hit and wonderful for gift-giving!  I learned this technique years ago and it's one of those tried but true things that always tend to wow people and makes a lasting impression!

This is the one I shared in an earlier post, designed with the October Stamp of the Month.

This one was made with the CUTE "Party Animal" stamp set, designed to coordinate with the Hooligans Paper packet.

So I didn't have to recreate the directions, I edited those posted by Jenni Mouer on Split Coast Stampers.

Supplies:  Candle - preferably white or cream, White Tissue Paper, Stamps, Ink Pads, Markers or some other type of coloring medium (chalk, etc.), Scissors, Wax Paper, Embossing Tool, Scotch Tape

Step-by-step Instructions:
1. Step 1 - Stamp on tissue paper. Use images that can be colored-in or solid images, in the ink color of your choice.

2. Step 2 - Color in stamped images using some form of coloring medium. If you would prefer not to color just use a solid stamp with your choice of ink.

3. Step 3 - Cut out your stamped images fairly close to the edges.

4. Step 4 - Take a piece of wax paper and cut it so that it is not any taller than the candle being used and long enough so that it wraps completely around the candle and then some. Use scotch tape to hold down the end of the wax paper for ease of holding the candle.

5. Step 5 - Take your first stamped image and place it on the candle. Then place the wax paper on top and wrap the wax paper around the candle. Make sure the wax paper is tight against the candle.

6. Step 6 - Heat up your embossing gun for 30-40 seconds until it is nice and hot. Moving quickly, wave it over the area where the stamped image is; be sure to keep the wax paper nice and tight. Every candle will have a different wax melting point, but you should see a change begin to take place within a few seconds. As the candle heats up, the pressure from the wax paper should push the image into the melting wax of the candle, embedding the image and leaving your image intact. Do not overheat!

Slowly peel the wax paper off the candle. Remember: every brand is different so if you are switching between brands you may need to adjust your heating times a bit.

7. Step 7 - Finish your candle.  You can put numerous images on one candle; just place another image and move the wax paper. It is best to try and not use the same spot on the wax paper for each image, but you can use 1 piece of wax paper numerous times. Add ribbon or other embellishments as desired.

NOTE: You can melt down the candle enough for a votive to fit in the “well”, allowing you to use the candle as a “candle holder”, preserving your image.

Have fun and I'd love to see what candles you decorate!

Saturday, October 2, 2010

C-U-T-E altered holiday items!

So I was supposed to run in a store and grab something else when these cute and attractive little "bowls" caught my eye in the Halloween aisle!  And of course I thought to myself, "How can I alter these with our adorable Close To My Heart products?" and this is what I came up with!
Using our "Party Animal" stamp set and the Hooligans paper pack, I decorated the focal point on this Halloween treat!  Of course the candy corn lent itself perfectly to this theme!

And...look at the Christmas one I made using the October Stamp of the Month and our Mistletoe paper packet!  I dare you to tell me they wouldn't make cute gifts!  LOL  I hope you like 'em!

Friday, October 1, 2010

It's the October Stamp of the Month Blog Hop!

Welcome to the October Stamp of the Month (SOTM) Blog Hop! We are featuring "Share the Magic", a set of 12 stamps.


If you have come here from Wendy's Blog you are on the right path! My blog marks the end of the "hop" but if this is your first stop, you may want to go back to Kathleen's Blog and start from the beginning! This month we have 70 Close To My Heart Consultants sharing their creations using this month's SOTM and other great CTMH products on their blogs.

This month I was inspired to make a couple of items with this stamp set (with more to come).  The first is this Circle Card - made with our NEW Circle Cards - already cut in circles with square envelopes to fit them! 

Using our beautiful Mistletoe paper and a pattern from our Wishes book, I "blinged up" the Christmas tree image from this stamp set using our Opaque Pearl Adhesive Gems and Red Sparkles.  I was able to achieve a "shading" effect when coloring the tree as I outlined it first using the New England Ivy Marker and then colored in the image using the Waterbrush pen and the New England Ivy Ink Pad.  Despite not having much artistic ability, the shading effect is doable with these supplies!  I finished off the card with some Cocoa Grosgrain Ribbon.

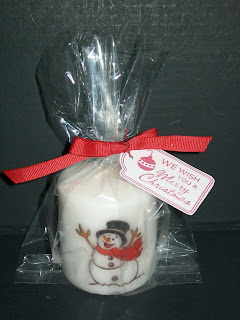
Next, I created this candle using the snowman image.  (Check back on Sunday for directions on how to stamp on candles.  I am teaching this technique at my team meeting on Saturday and will share information then.)  Wouldn't these make great gifts?


Be sure to visit all the Consultants at their Blogs to get some great crafting other fun ideas! Click here to start the blog from the beginning by visiting Kathleen's Blog! Remember, the October SOTM is only available until October 31, 2010. Contact me (or click here) to see how you can get this stamp set at a discount or even free!

To view other projects that have been made using this Stamp of the Month please click here. Happy hopping!