Monday, December 20, 2021

Winter Wonderland - Heart 2 Heart Challenge

Welcome to the last Challenge, for Heart 2 Heart, in 2021! If you have participated in any of our challenges this year, we say "thank you". We hope you will join us as we share our love for papercraftingin 2022. 


This week's theme is "Winter Wonderland". I can think of many ways to showcase that theme, but deciding on using a Polar Bear focal point for my creation. 


Who knew this "If Snowflake Were Kisses" Stamp Set + Thin Cuts would become one of my recent favorites?

The Snowflake Loose Sequins are perfect for the theme, of course, and I couldn't resist incorporating them into the Shaker element. The pattern papers are from the Mix-Ins paper packet, as I chose to keep this greeting card very simple.

Consider linking up to this Challenge on the Heart 2 Heart Blog. We would love to have you! 

Wishing you all the best this holiday season!

Wednesday, December 15, 2021

"Accents of White" CTMH Technique Blog Hop


Welcome to our Blog Hop where we are featuring techniques aligned with "Accents of White", while incorporating Close To My Heart products. 

If you are coming from Tamara's Blog, you are on the right track. You can find a complete list of participants at the bottom of this post. 


I have been having tons of fun incorporating the White Gel Pens into my artwork, which is what I did for this Technique Blog Hop. I used them on to create the snow in the background, and also accented the accents on the tree image. The little touch adds so much, in my opinion. 


To create the tag, I used the Buildable Tags Thin Cuts and make it look like a window. The addition of the acetate, made it possible. The trees on the outside of the window were created from the Jingle Joy stamp set. Both were stamped in Clover ink, with the furthest one done 2nd generation. 

I created a curved stencil and used the Peacock Feathers and Chipped Sapphire Oxide Ink to create the blue/night sky. Then, by adding the White Gel Pen, I was able to create some falling snow.  


For this tree, on the foreground, I used the Comfort & Joy stamp set. By adding the Liquid Pearls and White Gel accents, it added a bit more to this gift tag, providing a finishing touch. I was excited with the results. 

I appreciate you stopping by and send you to Darlys Recker's Blog. Be sure to keep making your way around the Blog Hop to see what everyone has created to share with you today. Happy hoppin'!


List of Participants:
1. Melissa Robinson *YOU ARE HERE*

Monday, December 6, 2021

Embellish It! Heart 2 Heart Challenge

Good morning and happy Monday! I wish you a great start to your morning and week!

Thank you for joining me/us for the Heart 2 Heart Challenge, "Embellish It!" It's the first one for December and we hope that you'll join the creative fun and share your artwork with us. Please be sure to use at least one Close To My Heart product in your creation. 


I decided to glitz up this handmade giftcard by adding some simple but fun embellishments, mostly hand-created. I stamped on patterned paper (pink ornament and present), did tone-on-tone stamping (green present), used the White Gel Pen, Gold Glitter Paper and included some Liquid Pearls. I love how it all came together for this finished result. It's super festive!


Believe it, or not, all stamp images used on this front of this card are from this "Deck the Palms" stamp set, a special that continues through the end of this month. It doesn't have to be used for a tropical theme at all, if you choose not to use the flamingo. 


This is how the inside of the gift card holder looks. Isn't it fun (and simple)?! I love that giving a gift card doesn't have to be considered "without thought", if there is intention and love for the recipient. In fact, I enjoy being able to redeem gift cards and having packaging like this would make it extra special, don't you think?!

(NOTE: I did host a Santa's Workshop this weekend, virtually, where I showcased a variety of artwork projects, dimensions to recreate them, techniques and so much more! If you don't currently have a CTMH Maker, contact me via email - mlisrobinson@gmail.com - and I'm happy to invite you to join the fun!)

Thank you for joining us this week at Heart 2 Heart. Be sure to link up to this challenge, and future challenges, as we celebrate and share our love for papercrafting!

Make it a great day!


Wednesday, December 1, 2021

Owl Love You Forever - December Stamp of the Month


 The December Stamp of the Month is called "Owl Love You Forever" and we are showcasing artwork created with it. 


This stamp set, valued at $18.95, includes these stamp images and you can get it FREE, if you're a VIP, or for $5, with a qualifying $50 order. To read more about our Stamp of the Month Special, click here

If you are coming from CatScrapbooking, you are on the right path. You can find a list of participants by clicking here


I had fun creating this fun, simple, and happy card featuring two of the images contained in the exclusive stamp set. 


By using the Hearts Slimline Thin Cuts, and creating a stencil, I sponged Picked Raspberry Oxide Ink to create the background. Because I wanted a little more control, I did use a dauber to apply the ink and kept it in place using washi tape. 


This fun and whimsical background, with a few hearts accented with a White Gel Pen, made for a happy card. Tri-Blend Markers were used to color in the images and I decided not to add any additional embellishments. I'm looking forward to creating some additional artwork using these fun images, with fabulous sentiments. 

Head on over to Melinda's Blog as you make your way around the Hop and see other creations made with this stamp set. I appreciate you stopping by! Happy hoppin'!


Monday, November 29, 2021

Deck the Palms Blog Hop


I'm excited you are joining us for this Blog Hop featuring the exclusive "Deck the Palms" product collection that can be used for anything tropical, including a tropical Christmas! With its unique design, you can flip over the paper to change the themes. Isn't that wonderful? 


The Bundle includes exclusive stamp sets, paper packet, sticker sheets, coordinating cardstock, acrylic shapes of two designs AND palm leaf Thin Cuts! You can view all of the purchasing options by clicking here, and you save 20% when you get all of it!

If you are coming from Wendy's Blog, you are on the right path. You can find a list of participants by clicking here.

I am sharing several pieces of artwork as it's easy to fall in love with all things in this Collection. 

I decided to go with a tropical Christmas for this card as we have family members in Florida and it would be perfect for them. Truth be told, I wouldn't mind celebrating Christmas in Florida (LOL) for an excuse to scrapbook some photos with this beautiful paper. 

I used the smaller flamingo from the card workshop but then fussy cut the Santa's hat from the larger flamingo and then just glued it on top. For my card design, I found the larger flamingo was a bit too big when I wanted to use the patterned paper and show enough of it.


I enjoyed adding a few of the Acrylic Shapes to use as embellishments on this card. Did you know they are now thinner than they used to be? I love that CTMH changed that, allowing us to use them on cards and other mailed items.


For this card, I decided to follow a design from Katy Taylor (who is a great friend and on my team 💜) from last year. I though the gorgeous Wild Berry Loose Sequins would be gorgeous with the color combination and that star patterned paper is one of my favorites because of the fun and bright color! To create this kind of a Shaker Card, I used the 3" x 4" Flip Flaps. I did secure it to the card base so it's not interactive, but instead provides a fun and transparent background, for the sequins to shine through.


And...I couldn't end this blog post without including these cards I made from the workshop directions that are FREE and downloadable. Just visit a respective workshop kit - Cards or Scrapbook Layouts (Tropical or Christmas) - and you will find the link to download it.

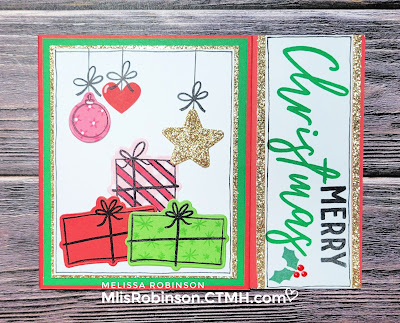
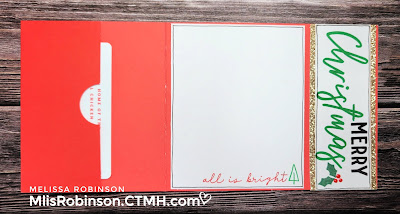
For these two cards, I loved the use of the striped or polka dot pattern towards the top and the different ways the ornaments were decorated - stamped and cut from paper. 

Besides the color combination being awesome and bright on these cards, I also love how we used the White Gel Pen to create accents on the ornaments. These cards are just super happy and I'm totally fine with working outside of the traditional Christmas colors. 

If you haven't checked out these workshop options, be sure to click on the respective product offerings. This "Deck the Palms" Special is a must-have and only available through the end of December 2021, while supplies last. 

Now it's time to have fun by seeing what the others have created to share with you! Head on over to Cat Scrapbooking to view her creation! We appreciate you stopping by and letting us know what you think by leaving comments! Enjoy the rest of your week!

Thursday, November 18, 2021

November/December NEW Product Blog Hop

Welcome to our Blog Hop where we are featuring NEW products released in the November/December Idea Book.With the beautiful artwork showcased on the cover, you'll want to be sure you check out all of the new items available to you. You can view the digital copy by clicking here, although you can receive a FREE hard copy when you place an order of any size. 

If you are coming from Gina's Blog, you are on the right track. You can find a complete list of participants by clicking here.

These are the two cards I created using the If Snowflakes Were Kisses Stamp + Thin Cuts. While I thought this stamp set was adorable when I first put my eyes on it, I didn't order it immediately.  And then...I started to see some great artwork created with it and decided I needed it too!
I kept the design of this card very simple. The patterned paper used, on both cards, is from the Wonderland Collection


I love the soft colors of this perfect color combination. 


After coloring in the scarf and earmuffs with the Dark Red Tri-Blend Marker, I decided to use the White Gel Pen to accent the scarf. I love how it turned out! In fact, it ended up having a bit of a pinkish tone, come from the red marker. While difficult to tell from the photo, I did use the Onyx Pearl Liquid Pearls on the penguin's eyes, to add some dimension.
For the second card, I couldn't resist using the polar bear image. Markers were used for his scarf as well and then I couldn't resist using the hat and tree from the Wonderland Felt Shapes.


With a few Snowflake Loose Sequins, some Black Onyx Pearls on his nose and eyes, and the White Gel pen on the Charcoal frame, they were just enough for this wintery card.

I appreciate you stopping by and invite you to head on over to CatScrapbooking to see what she's created to share with you. I always love her artwork! Happy hoppin'!


Monday, November 15, 2021

"Silver and Gold" Technique Blog Hop


Welcome to this Technique Blog Hop where we are creating artwork with Silver and/or Gold. Participants can choose to incorporate either, or both, into their designs and I can't wait to see what everyone has to share today. 

If you are coming from Katy's Blog, you are on the right track. You can find a complete list of participants provided at the bottom of this post.


I experimented with a few Silver and Gold ideas and finally settled on these simple, but striking, ornaments by way of "shakers". These Star Shaker Window Thin Cuts were great for making these elements that could be hung on a tree or used as gift tags. They could also serve two-fold as an element on a Christmas card that could then be used as an ornament. 

They were super simple to put together. I used the respective Silver and Gold Embossing Powders, as well as Glitter Paper. The cardstock colors used are Sapphire and Scarlet. The Star Confetti, in both shades, were obviously perfect. I did use Thread in order to create the hanging ribbon. 

I know you'll be inspired with the artwork that lies ahead. Now, head on over to Haley's Blog to see what she has created to share with us today. Thank you for stopping by!


List of Participants:

1. Melissa Robinson *YOU ARE HERE*
2. Haley Dyer
3. Cat Nowak
4. Michelle Loncar
5. Wendy Kessler
6. Darlys Recker
7. Brandi Robinson
8. Michelle Johns
9. Judy Dahlgren
10. Tamara Sandwisch
11. Katy Taylor

"Rose Gold" Heart 2 Heart Challenge

Welcome to this week's "Rose Gold" Heart 2 Heart Challenge. Consider creating artwork and linking up to the Challenge on the Heart 2 Heart Blog. Be sure to incorporate at least one Close To My Heart product in your creation. We love seeing what you have to share!

I've been wanting to make a card using the Peace & Love Stamp + Thin Cuts, with the beautiful angel images, and finally took the time to do so for this card. 

For the Rose Gold touch, that was easy. I used the Rose Gold Foil Paper and Rose Gold Shimmer Trim for the fun accents on this artwork. I looked up some coordinating colors for rose gold and found that grays and pinks/oranges were great for it. I pulled in Papaya, Flamingo-ish (for the marker color) and Pewter.


I love the softness of this design, despite the added bling, that is add the perfect touch, in my opinion. The Foil Paper does not photograph well. I love it and encourage you to check it out. It comes in different colors and patterns. 


Link up to us for this Heart 2 Heart Challenge. Follow the link and read the details. Make it a GREAT week!


Friday, November 5, 2021

Holiday Cards Blog Hop


Welcome to our "Holiday Cards" Blog Hop where participants are using Close To My Heart product for anything "holiday", at this time of the year. It will be fun to see what everyone has to share!

If you are coming from Wendy's Blog, you are on the right track. You can find a complete list of participants by clicking here

Using this month's Stamp of the Month, "Created to Shine", I created this window scene. Silver Foil Paper was used as was the Multi Square Windows Thin Cut to create this look. I love how the shaker elements on the above photo resembles snowflakes falling. Do you see it too? 


For the Shaker portion, I used the Rectangle Shaker Foam + Acetate largest piece along with the Silver Loose Sequins. The sentiment, stamped on Candy Apple cardstock, is from the For All Occasions (D2052) stamp set. I couldn't resist adding some White Gel Pen for the stitching on the banner. 

I super duper love how quick and easy this came together. The longest amount of time was spent on deciding the color of the lights and coloring them in! LOL And actually, that didn't take very long. 

Head on over to Melinda's Blog to see what she has created to share with you! Thanks so much for stopping by. 


Monday, November 1, 2021

"Created to Shine" November Stamp of the Month Blog Hop


Welcome to our November Blog Hop where we are featuring the awesome and inspiring "Created to Shine" stamp set. It can be yours FREE (for VIPs) or for $5, with a qualifying purchase. Valued at $18.95, that's a great bargain! Read more about our Stamp of the Month Program here


We're excited to share fun creations with you. If you are coming from Stefani's Blog, you are on the right track. You can find a complete list of participants by clicking here
I am excited to share this card I designed, that I made into a shaker card! Yes, I did and I'm thoroughly pleased with the result! 


To create the shaker lightbulbs I did use an exacto knife. I carefully placed 3-D Foam Tape around the edges of those bulbs so the shaker parts didn't fall out. 


Here is a photo of the beautiful back side of that piece. LOL I glued the small cardstock pieces on the back, that coordinate with the color of the sequins I placed inside. For the acetate window, I just took one of our Rectangular Shaker Window Foam & Acetate pieces to cut the size needed.

I had a fun time creating this and love the happy result of this card. It makes me smile and I hope it does the same for you! It can totally be used for the holidays, or for anytime of the year! YOU ARE CREATED TO SHINE!

Thank you very much for stopping by. Now head over to CatScrapbooking to see what she has created to share with you. I'm sure you'll love what you see as you make your way around this Blog Hop. 

Happy hoppin'!