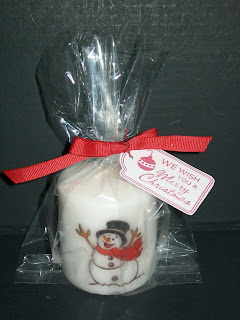
I was able to spend yesterday with several team members in the area. We worked on two Christmas workshops and decorated candles! It was a FABULOUS day! As promised, I am going to share how to do this fun technique that is super easy, takes little time but is a big hit and wonderful for gift-giving! I learned this technique years ago and it's one of those tried but true things that always tend to wow people and makes a lasting impression!
This is the one I shared in an earlier post, designed with the October Stamp of the Month.
This one was made with the CUTE "Party Animal" stamp set, designed to coordinate with the Hooligans Paper packet.
So I didn't have to recreate the directions, I edited those posted by Jenni Mouer on Split Coast Stampers.
Supplies: Candle - preferably white or cream, White Tissue Paper, Stamps, Ink Pads, Markers or some other type of coloring medium (chalk, etc.), Scissors, Wax Paper, Embossing Tool, Scotch Tape
Step-by-step Instructions:
1. Step 1 - Stamp on tissue paper. Use images that can be colored-in or solid images, in the ink color of your choice.
2. Step 2 - Color in stamped images using some form of coloring medium. If you would prefer not to color just use a solid stamp with your choice of ink.
3. Step 3 - Cut out your stamped images fairly close to the edges.
4. Step 4 - Take a piece of wax paper and cut it so that it is not any taller than the candle being used and long enough so that it wraps completely around the candle and then some. Use scotch tape to hold down the end of the wax paper for ease of holding the candle.
5. Step 5 - Take your first stamped image and place it on the candle. Then place the wax paper on top and wrap the wax paper around the candle. Make sure the wax paper is tight against the candle.
6. Step 6 - Heat up your embossing gun for 30-40 seconds until it is nice and hot. Moving quickly, wave it over the area where the stamped image is; be sure to keep the wax paper nice and tight. Every candle will have a different wax melting point, but you should see a change begin to take place within a few seconds. As the candle heats up, the pressure from the wax paper should push the image into the melting wax of the candle, embedding the image and leaving your image intact. Do not overheat!
Slowly peel the wax paper off the candle. Remember: every brand is different so if you are switching between brands you may need to adjust your heating times a bit.
7. Step 7 - Finish your candle. You can put numerous images on one candle; just place another image and move the wax paper. It is best to try and not use the same spot on the wax paper for each image, but you can use 1 piece of wax paper numerous times. Add ribbon or other embellishments as desired.
NOTE: You can melt down the candle enough for a votive to fit in the “well”, allowing you to use the candle as a “candle holder”, preserving your image.
Have fun and I'd love to see what candles you decorate!


Great project!
ReplyDeleteThanks, Debra! I appreciate your positive feedback and hope you'll check back often!
ReplyDelete