Showing posts with label #whitegelpen. Show all posts

Wednesday, May 18, 2022

May-June New Product Showcase: Coffee Helps! ☕


On May 1st, we unveiled the May-June Idea Book which contains fabulous new products and inspiring artwork for you to use on your papercrafting projects. You can get a hard copy of it FREE with an order of any size placed on my website, or you can view it digitally by following this link. You will love all that is contained inside so what are you waiting for? 
 
Today's good mood...brought to you by coffee! Can anyone relate? ðŸ™‹‍♀️


I had a great time making this fun, simple, and happy card with the "Coffee Helps" stamp set, the flowered Zip Strip and patterned paper from the May-June Mix-Ins, and a splash of Capri cardstock. I am pleased with how it came together and hope you like it as well!

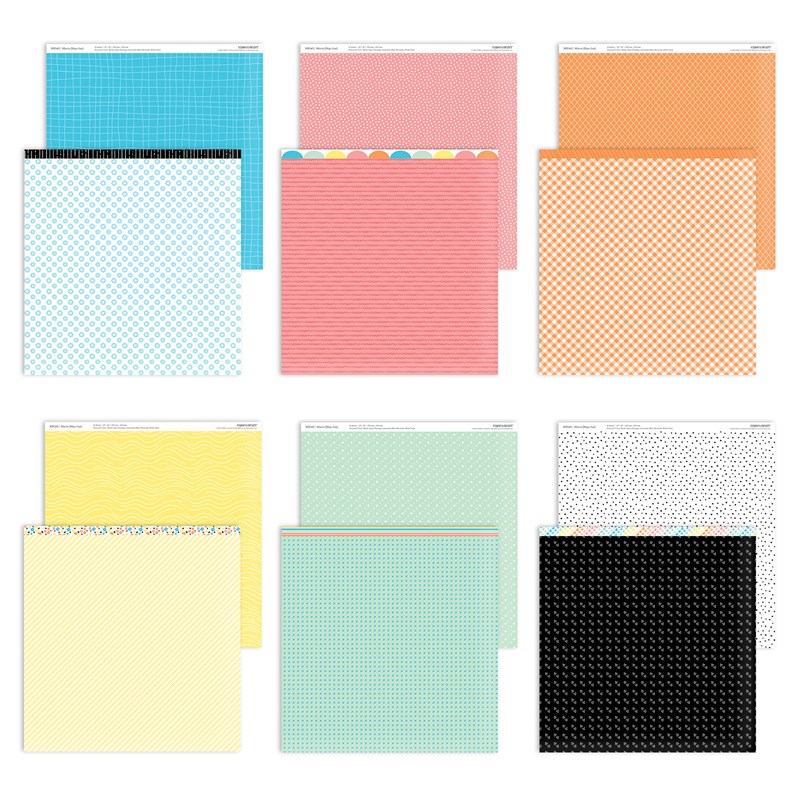
These are the paper designs from the Mix-Ins. You can click on the image to enlarge, or view them in greater detail on my website.


I did include some paper-piecing on the coffee and mugs. To create the coffee, I stamped the image on Kraft Paper, fussy-cut it, and outlined the foam images using the White Gel Pen. I had to make it look somewhat real. I stamped both cups on White Daisy cardstock and also paper-pieced the fun Flamingo paper design.

It was kept very simple with some Black Dots added as accents.

Thanks for stopping by and consider leaving a comment below, or your questions. I love hearing from my readers! Now...where's my coffee?! ☕


Tuesday, March 15, 2022

"Creative with Cardstock" Blog Hop


Welcome to this Blog Hop where we are highlighting Close To My Heart's Cardstock through the theme of "Creative with Cardstock". Did you know our cardstock is on SALE this month through the Cardstock Carnival


You can save up to 30% on bundles and you will want to be sure to check out the unique and exclusive UV-coated option

If you are coming from Darly's Blog, you are on the right track. You can find a complete list of participants at the bottom of this post. I am confident you will enjoy seeing different ways in which we have incorporated cardstock into our artwork so be sure to make your way around the Blog Hop.


I did not get fancy with the creation of this card, and do not feel I had to once I started putting it together. While there are some very fun techniques to do with cardstock, I decided to show how simple it is to create with it and some of our Thin Cuts. In fact, the only thing stamped is the sentiment, in White Daisy ink. Plus, with the use of the White Gel Pen, the added border is fun when done on Black cardstock


I used these Layered Flowers Thin Cuts and absolutely love them. They are such beautiful cuts and make creating very simple. 


Cardstock colors used: Wild Berry, Flamingo, Green Apple, Lemonade, and Capri. For a simple addition, I used the White Dots for the flower center. 

Thank so much for stopping by. Now it's time to head over to Brandi's Blog to see what she has created to share with you. Consider leaving a comment before you head her direction. 

I hope this month has been great to you! 


PARTICIPANTS:

1. Melissa Robinson *YOU ARE HERE*

Wednesday, December 15, 2021

"Accents of White" CTMH Technique Blog Hop


Welcome to our Blog Hop where we are featuring techniques aligned with "Accents of White", while incorporating Close To My Heart products. 

If you are coming from Tamara's Blog, you are on the right track. You can find a complete list of participants at the bottom of this post. 


I have been having tons of fun incorporating the White Gel Pens into my artwork, which is what I did for this Technique Blog Hop. I used them on to create the snow in the background, and also accented the accents on the tree image. The little touch adds so much, in my opinion. 


To create the tag, I used the Buildable Tags Thin Cuts and make it look like a window. The addition of the acetate, made it possible. The trees on the outside of the window were created from the Jingle Joy stamp set. Both were stamped in Clover ink, with the furthest one done 2nd generation. 

I created a curved stencil and used the Peacock Feathers and Chipped Sapphire Oxide Ink to create the blue/night sky. Then, by adding the White Gel Pen, I was able to create some falling snow.  


For this tree, on the foreground, I used the Comfort & Joy stamp set. By adding the Liquid Pearls and White Gel accents, it added a bit more to this gift tag, providing a finishing touch. I was excited with the results. 

I appreciate you stopping by and send you to Darlys Recker's Blog. Be sure to keep making your way around the Blog Hop to see what everyone has created to share with you today. Happy hoppin'!


List of Participants:
1. Melissa Robinson *YOU ARE HERE*

Monday, December 6, 2021

Embellish It! Heart 2 Heart Challenge

Good morning and happy Monday! I wish you a great start to your morning and week!

Thank you for joining me/us for the Heart 2 Heart Challenge, "Embellish It!" It's the first one for December and we hope that you'll join the creative fun and share your artwork with us. Please be sure to use at least one Close To My Heart product in your creation. 


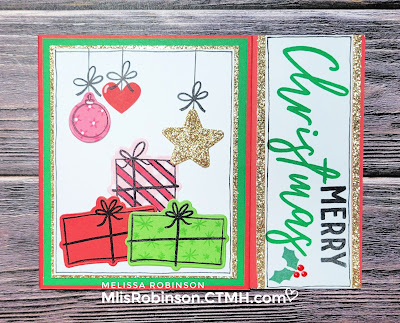
I decided to glitz up this handmade giftcard by adding some simple but fun embellishments, mostly hand-created. I stamped on patterned paper (pink ornament and present), did tone-on-tone stamping (green present), used the White Gel Pen, Gold Glitter Paper and included some Liquid Pearls. I love how it all came together for this finished result. It's super festive!


Believe it, or not, all stamp images used on this front of this card are from this "Deck the Palms" stamp set, a special that continues through the end of this month. It doesn't have to be used for a tropical theme at all, if you choose not to use the flamingo. 


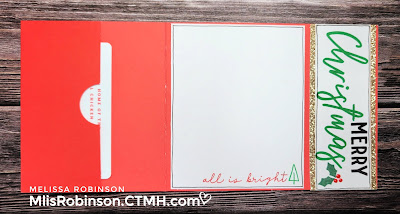
This is how the inside of the gift card holder looks. Isn't it fun (and simple)?! I love that giving a gift card doesn't have to be considered "without thought", if there is intention and love for the recipient. In fact, I enjoy being able to redeem gift cards and having packaging like this would make it extra special, don't you think?!

(NOTE: I did host a Santa's Workshop this weekend, virtually, where I showcased a variety of artwork projects, dimensions to recreate them, techniques and so much more! If you don't currently have a CTMH Maker, contact me via email - mlisrobinson@gmail.com - and I'm happy to invite you to join the fun!)

Thank you for joining us this week at Heart 2 Heart. Be sure to link up to this challenge, and future challenges, as we celebrate and share our love for papercrafting!

Make it a great day!


Monday, November 29, 2021

Deck the Palms Blog Hop


I'm excited you are joining us for this Blog Hop featuring the exclusive "Deck the Palms" product collection that can be used for anything tropical, including a tropical Christmas! With its unique design, you can flip over the paper to change the themes. Isn't that wonderful? 


The Bundle includes exclusive stamp sets, paper packet, sticker sheets, coordinating cardstock, acrylic shapes of two designs AND palm leaf Thin Cuts! You can view all of the purchasing options by clicking here, and you save 20% when you get all of it!

If you are coming from Wendy's Blog, you are on the right path. You can find a list of participants by clicking here.

I am sharing several pieces of artwork as it's easy to fall in love with all things in this Collection. 

I decided to go with a tropical Christmas for this card as we have family members in Florida and it would be perfect for them. Truth be told, I wouldn't mind celebrating Christmas in Florida (LOL) for an excuse to scrapbook some photos with this beautiful paper. 

I used the smaller flamingo from the card workshop but then fussy cut the Santa's hat from the larger flamingo and then just glued it on top. For my card design, I found the larger flamingo was a bit too big when I wanted to use the patterned paper and show enough of it.


I enjoyed adding a few of the Acrylic Shapes to use as embellishments on this card. Did you know they are now thinner than they used to be? I love that CTMH changed that, allowing us to use them on cards and other mailed items.


For this card, I decided to follow a design from Katy Taylor (who is a great friend and on my team 💜) from last year. I though the gorgeous Wild Berry Loose Sequins would be gorgeous with the color combination and that star patterned paper is one of my favorites because of the fun and bright color! To create this kind of a Shaker Card, I used the 3" x 4" Flip Flaps. I did secure it to the card base so it's not interactive, but instead provides a fun and transparent background, for the sequins to shine through.


And...I couldn't end this blog post without including these cards I made from the workshop directions that are FREE and downloadable. Just visit a respective workshop kit - Cards or Scrapbook Layouts (Tropical or Christmas) - and you will find the link to download it.

For these two cards, I loved the use of the striped or polka dot pattern towards the top and the different ways the ornaments were decorated - stamped and cut from paper. 

Besides the color combination being awesome and bright on these cards, I also love how we used the White Gel Pen to create accents on the ornaments. These cards are just super happy and I'm totally fine with working outside of the traditional Christmas colors. 

If you haven't checked out these workshop options, be sure to click on the respective product offerings. This "Deck the Palms" Special is a must-have and only available through the end of December 2021, while supplies last. 

Now it's time to have fun by seeing what the others have created to share with you! Head on over to Cat Scrapbooking to view her creation! We appreciate you stopping by and letting us know what you think by leaving comments! Enjoy the rest of your week!

Friday, October 15, 2021

"Stamping on Cardstock" CTMH Technique Blog Hop


Welcome to our October Technique Blog Hop where we are "Stamping on Cardstock". There are so many ways to incorporate the two and I can't wait for you to see the awesome creations from our participants. If you are coming from Maz's Blog, you are on the right track. You can find a complete list of participants at the bottom of this post. 
I've had my eye on this card pattern for some time, from the Make It From Your Heart Volume 5 How-to Book, and decided to put it to use for this handmade card. To create it, you cut squares and rectangles of different size and then cut from the center to an edge to create the v-shape. By layering coordinating cardstock together, you get this result. Isn't it great?! 

I felt the need to add a bit of dimension and did so by stamping with Mulberry ink on Mulberry cardstock (the darker side), for "tone-on-tone" stamping. That is one of my favorite techniques to do on cardstock. I love being able to create my own patterned paper. 

The cardstock colors I used are: Mulberry, Capri, Harbour, Paprika and Shortbread (what the images are stamped on).


After stamping the images from the Pumpkin Treats stamp set (+ Thin Cuts), I used Tri-Blend Markers to color them in. I debated on what I wanted to use for the whip cream - Paste, Embossing Powder, etc. - and decided on using our NEW White Gel Pens. A little bit of Thin 3-D Foam Tape and some Blue Belle Loose Sequins were all I used to finish off this card. 
Oh! The sentiment comes from one of my favorite new stamp sets, "For All Occasions". I love the variety provided as well as the different fonts that are included. 

I appreciate you stopping by and encourage you to continue making your way around the hop to see what the others have created to share with you! Now, head on over to Cat's Blog and enjoy your weekend! Happy hopping!


Participants:

1. Melissa Robinson *YOU ARE HERE*
2. Cat Nowak
3. Haley Dyer
4. Michelle Loncar
5. Wendy Kessler
6. Darlys Recker
7. Tamara Sandwisch
8. Maz Wood