Showing posts with label #handmadechristmascard. Show all posts

Sunday, July 25, 2021

"Christmas In July" Blog Hop


Welcome to our "Christmas in July" Blog Hop where participants are showcasing artwork using currently available products, from Close To My Heart, to celebrate the Christmas holiday during these hot summer months. 


It is perfect for aligning with the return of "White Pines", a previously retired collection that can help you get a headstart on your Christmas papercrafting projects. 


PLUS, a new special called "Holiday Stories", is the perfect mini album for new or past Christmas memories. 
If you are coming from Wendy's Blog, you are on the right track. You can find a complete list of participants here.
  

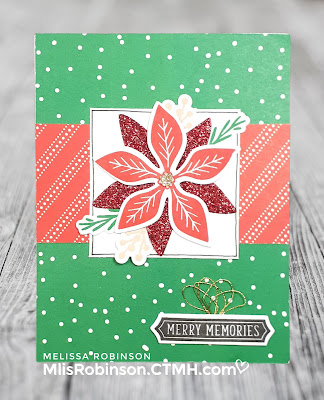
I used the Holly Jolly Paper Packet to create my card and kept the design relatively simple with the festive colors and paper. 


The Thin Cut and stamped images, to include the sentiment, are all from the Comfort & Joy - Scrapbooking Stamp + Thin Cuts Set (Z3772). I love the beautiful poinsettia that can be created and I decided to toss in a little bit of Scarlet Glitter Paper (Z3839)


Here is a close-up of the focal point. To add a bit of glitz, I added a Gold Glitter Gem (Z3312) and Gold Embellishing Thread (retired). 

Ink colors used: Almond, Candy Apple, Clover, Black

I hope you like what I have shared with you! It is time for you to go see what Brenda has created on her blog. Have fun on our Blog Hop! I hope you are inspired! 


Monday, October 28, 2019

"Anything Goes" Heart 2 Heart Challenge

Welcome to this week's Heart to Heart Challenge that allows you to create anything you want as long as you incorporate Close To My Heart products in your creation. This week's theme is called "Anything Goes"!


I am thankful I had an opportunity to create some fun greeting cards this weekend and decided on showcasing this one today. There is a card in the November/December Idea Book that uses strips (for a birthday card) and I decided to alter it slightly for a Christmas card. 

By cutting 1/2" x 4 1/4" strips, I generated the background as shown. Feeling that the card needed a bit more, I decided to stamp some of the small stars, in Glacier ink, and believe it was the perfect addition. 


The stamps came from this adorable and exclusive stamp set, only available through the end of November (while supplies last) as part of the "Holiday Cheer" Special. I couldn't resist adding a few Candle Apply Holly Jolly Dots for some ornaments on the tree. And last, but not least, the gold star was generated through the use of the Golden Rod Stickles.

I'm really please with how this card turned out and do plan on making more, especially since it takes little paper. Gotta love when that's the case! 


Join us for this (and other) Heart 2 Heart Challenges. You can find the details through the link and then be sure to connect with us for the respective challenge. I hope to see your artwork there! 

Have a blessed week!

Friday, November 16, 2018

Merry Christmas Blog Hop

Thank you for joining us for this Blog Hop where we are featuring Christmas-related artwork!

It's hard to believe Christmas is right around the corner so there is no time to delay! There is no doubt you will be inspired by all you see, as you click on the related links and make your way around the circle.

If you are coming from Wendy's Blog, you are on the right track. You can find a complete list of participants by clicking here.


I have been making Christmas cards but decided to make a new one for this blog hop, trying out a pattern my friend had shared with me. I totally love how it came out!

Using the Oh What Fun - Cardmaking stamp set, I combined it with the 'Tis the Season paper pack. A little bit of paper-piecing and the


This is how the card opens, with the focal point on the front of the card hiding the stamped greeting on the inside. I love that!


Santa is a bit blinged up with the addition of the Clear Shimmer Brush.  

Thank you so much for stopping by on this Friday night! Head over to Melinda's Blog to see what she has created for you, as well as the rest of the ladies participating in this hop.

Have a blessed weekend!


Tuesday, October 16, 2018

Holiday Sparkle/Season of Joy BLOG HOP


Welcome to this Blog Hop where participants have the option to highlight the Holiday Sparkle Card Kit contents OR our Fabulous NEW Season of Joy Cricut Collection! I'm sure you're in for a BIG treat!

If you are coming from Chris Robertson's Blog, you are on the right track. Continue making your way around the circle to see some awesome creations! You can find a complete list of participants through this link.

I debated about which product line to work with tonight but settled on Holiday Sparkle. I totally love these shaker cards and the possibilities they offer for Christmas!


The card base, "Happy Holidays" sentiment, and striped Raspberry strip (behind the main sentiment) are all part of the original design of this card. By adding a few touches of my own, I was able to personalize it a bit. 
With the background of the circle being simple, I decided to stamp the image in Raspberry ink for some added color. I also random-stamped the small heart images in the bottom area using Ballerina ink. 
To create some additional color in the Silver Sequins, I cut out some of the hearts, using the Thin Cuts Shaker Window & Confetti. They were cut from Raspberry cardstock. The larger, stitched circle was used to create the covering of the shaker window. I used Lagoon cardstock. 

In order to make the card a bit more festive I decided to add Santa, of course, as well as Silver Embellishing Thread. A few additional confetti hearts were a perfect finish, I think. 


Here is a close-up of the details. I used some paste to give Santa some texture. You can see details about that process on this blog post.

You can find complete details about the Holiday Sparkle SPECIALwhich is only available this month and while supplies last, through the respective link. These cards are super easy to put together; I'm talking minutes!

While I haven't yet created anything with the Season of Joy Cricut Collection, it totally has some fabulous designs! I will be playing with it very soon!

Now, head on over to Cat's Blog. She's always got something awesome to share! Be sure to make your way around the Blog Hop to enjoy some festive creations! Let me know what you think about my card, by leaving a comment, before you do! I love hearing from you!

Always be sure to...Make it from your heart!

Thursday, September 13, 2018

In Any CASE...with Melinda & Melissa


Join us twice a month as we CASE, “Copy And Selectively Edit”, artwork created by the Art Department of Close To My Heart as showcased in the current Idea Books and our Make It From Your Heart How-To Books.

On the 2nd and 4th Thursday of each month, at 7 pm CST, we will direct you towards a piece of art and recreate it using the exact products or others that compliment its initial design. Tips, techniques and assembly directions will be shared in detail to help you recreate them on your own.

As you reproduce the items we have shared, post them on social media using the hashtag #ctmhinanycase. We will randomly search that hashtag and reward those who CASE our items. Winners will be announced on our blogs so be sure to follow us!

*************************************************


Today I am recreating this fun and simple card made with new products from the Oh What Fun product line. In the Idea Book it is showcased with other beautiful pieces of artwork so go check it out on page 65.

If you don't have a hard copy, don't worry! You can flip through the virtual pages of the Idea Book by clicking here. Want a hard copy? Contact me for details on how to get one in your hands!

My partner in CASEing, Melinda Everitt, is highlighting a fun card - that you will love - so be sure to keep reading to the bottom of this post.


Sometimes "simple and clean" is best, in my opinion. That is exactly what is taking place with this card design.

Just a 1 1/4" piece of the striped pattern paper, three die cut ornaments - and an adorable stamp set, and some Rasberry Baker's Twine are all it took to create it. Isn't that awesome?!
I have already created quite a few layouts and cards using this stamp set, Oh What Fun Cardmaking Stamp + Thin Cuts. I especially love, and can appreciate, the Thin Cuts that coordinate. They make it so easy to add these fun images to your creations. (You can also purchase the stamp set by itself.)

The cheerful colors of the paper, stamp images and twine create for a fun and festive Christmas card that is super easy to make!

Supply List:
X7238B Oh What Fun Paper Packet
Z4240 Oh What fun Cardmaking Stamp + Thin Cuts (or C1746 for just the stamp set)
Z4216 Raspberry Baker's Twine
Inks: Glacier, Pewter, Pixie, Raspberry


Melinda is making ⬆THIS⬆ card and tells you how on her blog. Go check out Melinda's creation. We love for you to leave comments so let us know what you think.

Tag your CTMH-CASEd artwork with #ctmhinanycase. We peruse social media and are ready to mail some goodies!

Enjoy the end to your week and be sure to... Make it from your heart!

Saturday, December 23, 2017

Gift Box in a Card

I have seen these cards over the last few months and decided to give one a try to teach to my team members when we gathered earlier this month. Believe it or not...SUPER EASY! In fact, you can actually put something fun (and small) in the gift box. One of my team members suggested a beautiful ring! LOL I was simply thinking chocolate. Duh! I need to dream bigger!

So what do you think you can do with this card since you [obviously] cannot put it in an envelope? It was suggested to place it on a desktop, beside table, etc. You can still write a greeting inside. While I created this with Christmas in mind, you can totally switch out the paper and colors for birthdays and other holidays/occasions. 
This super fun stamp set, "Thought that Counts", will no longer be available after the end of this month (and is only available while supplies last). Check out the cute sentiments and while perfect for Christmas, there are many you can use throughout the year! Which is your favorite?
The tag design in the stamp set coordinates with this set of Thin Cuts - Basic Tags. I used the one on the top left for these tags. You can use the 4 thin metal dies to quickly and easily cut the paper shapes shown in the photo. Size of the shapes: 2 1/2", 2", 1 1/2", 1". 

Thin Cuts are packaged on their own magnetic sheet and work well with most die-cutting machines. (I use a Cuttlebug.)

To create a card like this on your own, check out this great video I used to create mine. Feel free to contact me if you have questions and if you make one...please share it with me! I would love to see it!
Only two days until Christmas and I'm totally excited!

Wednesday, November 15, 2017

CTMH Technique Blog Hop - Thin Cuts Craze

Welcome to our Technique Blog Hop where we are featuring artwork aligned with the theme, "Thin Cuts Craze". We are focused on incorporating Close To My Heart's Thin Cuts which are metal dies that can be used with a Cuttlebug or other diecut machines. (They come packaged on their own magnetic sheet.) We have quite a variety of Thin Cuts to choose from. You can find them all by clicking HERE

If you are coming from Annemarie's Blog, you are on the right track. Be sure to continue to follow the links on each blog, so you can see a variety of creations made using Thin Cuts. You can find a complete list of participants at the bottom of this post. 
I used the Silver & Gold Cardmaking Stamp Set and Thin Cuts to create my card. I love the festive ornaments and sentiments. I hope you do too!
I tend to enjoy creating Christmas cards with non-traditional colors and here is another one of those instances. Inks used: Blossom (pink), Lagoon (blue) and Willow (green)

The three ornaments were cut using the Thin Cuts and then adhered directly to the background or applied with 3-D with Thin Foam Tape. A few Black Dots were added. 
And, while challenging to photograph, I added the Clear Shimmer Brush to the ornaments. It provides a little sparkle to them, adding a finishing touch. I love the Shimmer Brush. It is easy to work with and dries quickly.

Thank you so much for stopping by my blog. Be sure to continue checking out the other artwork items, leaving me a comment - if you'd like - before you do. I always enjoy hearing from you!

Head on over to Darlys Recker's Blog.

Enjoy the rest of your week!


List of Participants:
1. Melissa Robinson *YOU ARE HERE*
2. Darlys Recker
3. Debi McBain
4. Sarah Devendorf
5. Cat Nowak
6. Annemarie Julian

Saturday, October 21, 2017

Be a Cut Above the Others this Christmas!

As mentioned in a previous post, I enjoy gifting team members at events where we gather. I designed this card as a point of inspiration and Christmas card idea for them. I hope you enjoy it too!
Believe it or not, this card was pretty simple to assemble. The card base and tags were pre-designed, as included in the kits shown below. I stamped the sentiment on the circle, paper-pieced Santa's hat using Cranberry cardstock, and used the ShinHan markers to color the other parts of the image.

That piece was 3-D on top of the polka dot tag and the glitter bow was added for the perfect finishing touch. It came together quickly and can be duplicated easily.
This Cut Above Card Kit - Merry Everything includes materials to make 10 vertical 4 1/4" x 5 1/2" cards, including card bases, envelopes, and die-cuts. ($9.95)
The Cut Above Tag Kit - Merry Everything has materials to make 10 foil-stamped gift tags, including tags, die-cuts, and white twine.

Here are some samples, created by the Art Department, in their simplest form. They are super cute! 
The sentiment images are not included. You can find a variety of them here for just $2.95. 
I used Little Saint Nick. Choose the ones you love best! (Look through the first two pages in the link.)

If you would like to purchase the supplies used to make this card, contact me directly or purchase the products on my website.

Sunday, October 1, 2017

Christmas Tunes - Stamp of the Month Blog Hop

Welcome to this month's blog hop where we are featuring the October Stamp of the Month, "Christmas Tunes". While valued at $17.95, you can get it - this month only - for $5; a great price! Details about that can be found on my website.
These fun and whimsical designs will be a great design to your holiday projects and you'll get to see a variety of ways they are incorporated as you move throughout this hop.

If you are coming from Melinda's Blog, you are on the right track. A complete list of participants can be found here.

I decided to step outside the box and incorporated some atypical Christmas colors. Of course, I had to go with my favorite color, purple. In CTMH colors this is Pansy. :)
I stamped the ornament, in Black Ink and on White Daisy cardstock, and used ShinHan Markers to color in the images. The outer edges of the ornament is colored in with Gold Metallic Marker
These elements were added for a 3-D touch: Clear Bitty Sparkles, White Dots and Gold Ribbon from the Basics Ribbon Pack

I hope you like what I shared with you. Now head on over to Cat's Blog to see what she has designed. I'm confident it's something totally fun!

Here's to a wonderful October and a great week ahead!